Turkey and Spinach Burgers

DSC02608

We were in the supermarket, the four of us buying food for the long weekend vacation that we were about to spend in Palm Springs, tossing ideas back and forth on what we could make, when our friend Brad exclaimed “I could make these amazing turkey and spinach burgers one day for lunch!”

I admit it. My initial reaction went something like this in my head: Turkey burgers? With spinach? Are we being punished for something? Maybe if I pretend I didn’t hear him, he’ll forget he said it. 

DSC02595

Listen, I’m the furthest thing from a food snob. I’ll eat just about anything. But there’s one thing I generally don’t have any desire for:  so-called “healthy food.” To me, the real healthy food (no quotes) is food that’s fresh, made from things that didn’t grow in a lab, and that has not gone through twenty machines in a giant factory before wrapped into plastic and stuck in a freezer.

So, as soon as I heard the words “turkey,” “spinach,” and “burger,” I thought “healthy food.” Which was unfair, because in reality, these burgers are healthy food. However, I was still wary of the idea of burgers made with turkey, a meat usually just a step above styrofoam in flavor, and spinach, the only leafy green that, when cooked, makes me gag.

DSC02600

But, since Brad is one of my dearest friends and because I know he loves good food as much as I do, I said “Sounds good!” and continued with out grocery shopping. And then when he made these burgers for us and I took a bite, I was happy I trusted his food judgement. This burger’s name belies its flavor. The healthy dose of cumin gives the usually bland turkey meat a jolt of umami. And the chopped spinach and scallions provide not only flavor but also ensure that these burgers are juicy, despite the leanness of the turkey meat.

DSC02602

Turkey and Spinach Burgers – Slightly adapted from Bon Appétit

Makes 6 small burgers

Ingredients:

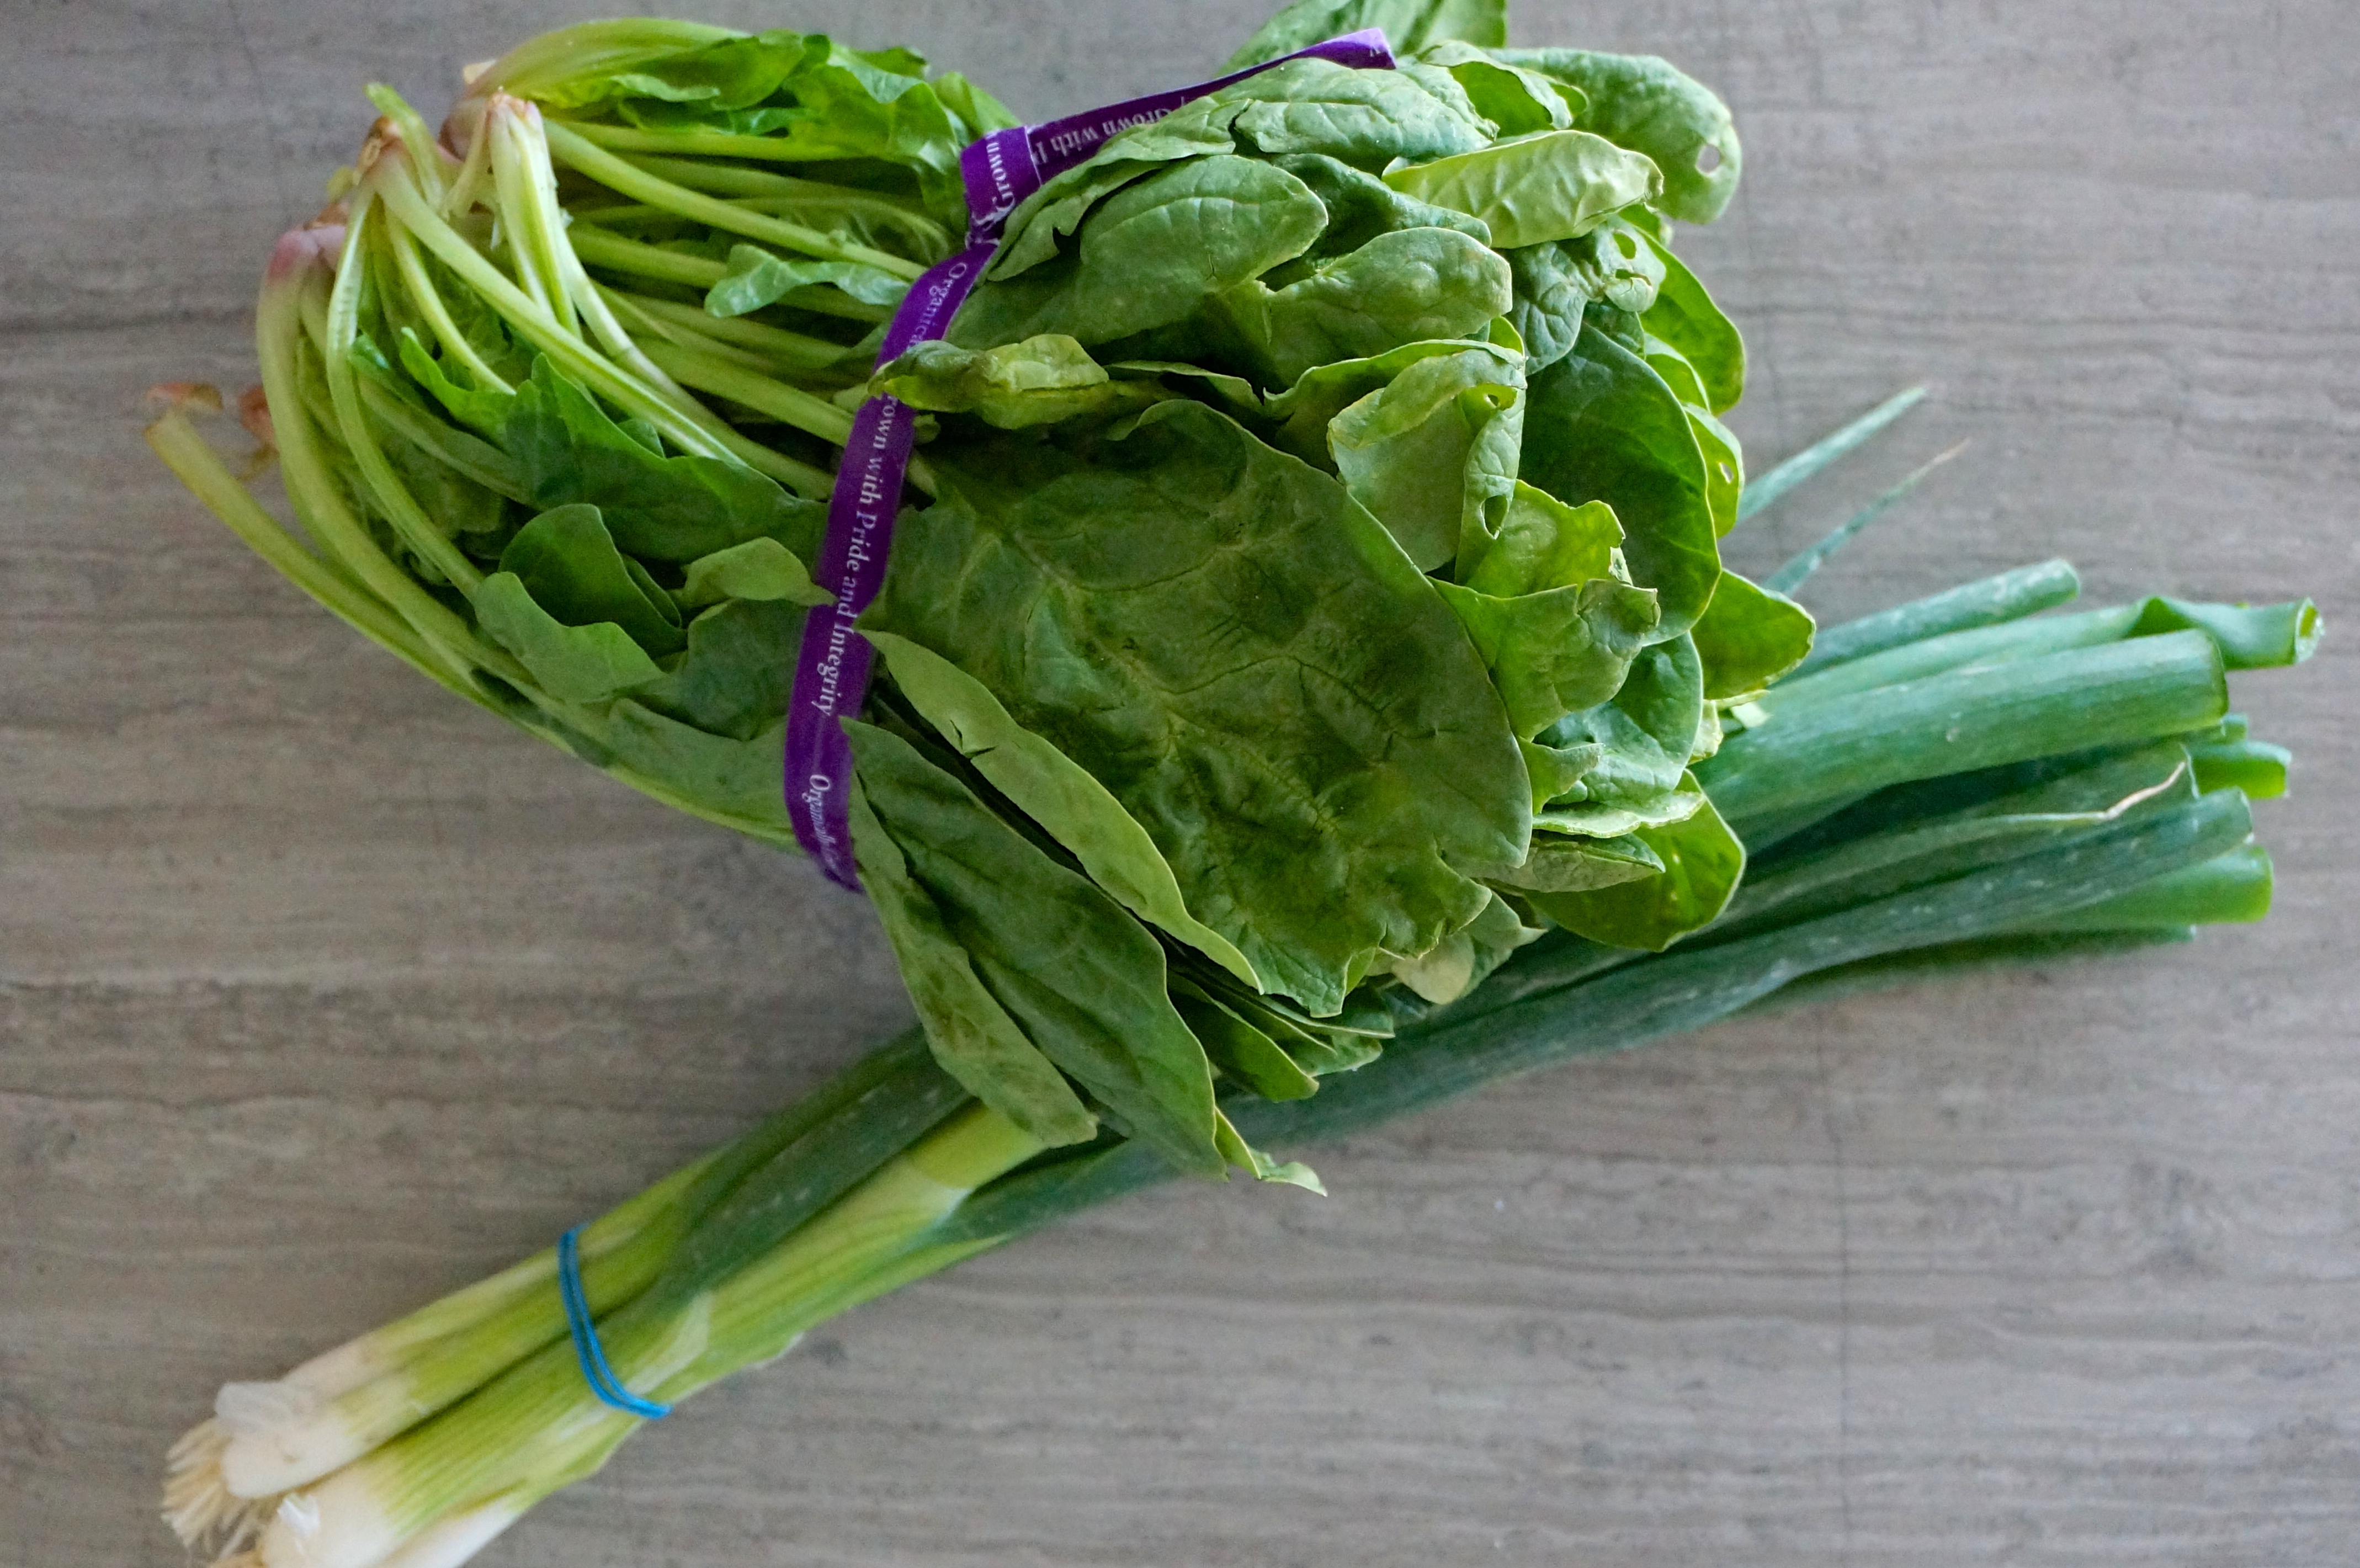
1/2 bunch flat-leaf spinach, thick stems removed, leaves chopped (about 3-4 cups)
4 scallions, thinly sliced
1 garlic clove, finely chopped
1 pound ground turkey
3/4 teaspoon ground cumin
Kosher salt, freshly ground pepper
3 tablespoons olive oil

Directions:

Combine spinach, scallions, garlic, turkey, and cumin in a medium bowl; season with salt and pepper. Using a fork, mix gently just to combine. Form turkey mixture into six 1-inch-thick patties.

Heat oil in a large skillet over medium-high heat. Working in 2 batches, cook patties until golden brown and cooked through (resist the temptation to press down on patties with your spatula while cooking), about 5-6 minutes per side (a meat thermometer inserted in the middle of a burger should read 160° F). Transfer to a plate.

Serve burgers on toasted buns with sliced tomato, pickles, ketchup, and mustard, or any of your favorite condiments.

DO AHEAD: Patties can be formed 1 day ahead. Cover and chill. Bring to room temperature before cooking.

Passion Fruit Ice Cream

DSC02632

My birthday was always my favorite day of the year when I was a kid. My parents made a big deal out of it and since my sister and I had birthdays that were separated by only 4 days, we celebrated them together, even when we were teenagers. Since we were only two years apart, we knew each other’s friends well and had no problem having one party where all of our friends were invited and had fun together.

The time of the year was always great too, because the weather at the end of April was usually warm and dry, while everything was in bloom. Our parents threw us a big party where everyone hung out in our big front yard. There was always music and lots of dancing (my sister and I loved to dance, and still do). There is a photo of me from what was probably my 8th birthday, twirling a girl from my class, most likely to an ABBA or Boney M song (my favorite bands at that time).

DSC02616

As an adult, I still love my birthday and I still get excited at the prospect of opening presents and celebrating a day that’s all about me. But not all of my adult birthdays have included big parties and dancing. Take this year, for example. The night before my birthday, I had an MRI of my left hip and lower spine to figure out the source of the hip pain and foot numbness that I’ve had since October (it turns out it’s a labral tear, tendonosis, and bursitis). Nothing makes you feel like you’re getting older quite like hip pain. Then I got home and in the middle of dinner a piece of my lower front tooth just fell off. The next day, the day of my birthday, we woke up to freezing temperatures (at the end of April) and one of the rainiest days in the history of New York city. On top of that I had to work all day and teach in the evening.

But before you start to feel sorry for me, I should tell you that after all that I got to come home to a lovely dinner with my amazing husband, who bought me presents and brought me flowers, and finished it all with a hefty scoop of this passion fruit ice cream, one of my favorite desserts. Which is to say, I had a great birthday again.
DSC02628


Passion Fruit Ice Cream

Note: I use the frozen passion fruit pulp from Goya, which I thaw before adding to the egg yolks. You can also buy fresh passion fruits and extract the pulp yourself. If you do so, you can either strain the seeds or leave them in for the added crunch.

Ingredients:

1 can (14oz sweetened condensed milk)
1 cup heavy cream
1/2 cup sugar
pinch of salt
1 cup passion fruit pulp (see note)
4 large egg yolks

Directions:

In a small bowl, whisk together the egg yolks and the passion fruit pulp. Place a mesh strainer on top of a medium bowl and set aside.

In a saucepan, add sweetened condensed milk, cream, sugar, and pinch of salt. Heat, stirring frequently, over medium heat until combined and bubbles start to form.

Temper the egg yolks by slowly pouring about 1/3 cup of the hot milk mixture into the egg yolks, while whisking constantly. Scrape the tempered egg yolk mixture into the saucepan, again whisking constantly. You’ll notice that the mixture will immediately become thicker. Continue to cook over medium heat for another 4 minutes, stirring constantly with a spatula and scraping the bottom and sides of the pan.

Pour the mixture through the mesh strainer into the medium bowl. Let cool completely and chill thoroughly in the refrigerator.

Freeze the ice cream in your ice cream maker according to the manufacturer’s instructions.

Chicken with Shallots, Tomatoes, and Tarragon

DSC02522I work close to Kalustyan’s, the spice and food emporium that pretty much every chef in the world knows and buys from (they ship everything worldwide). It’s an unassuming place, next to a takeout Indian restaurant called Curry in a Hurry. Inside, there are more spices, sauces, frozen foods, and ingredients than you could ever imagine. The incredibly narrow aisles are surrounded on both sides with shelves up to the ceiling, packed with bags of different sizes that are filled with exotic sounding spices like Anardana (sour pomegranate seeds used as a souring agent), Radhuni (an incredibly pungent spice from Bengal), Jaffna (a hot curry powder from Sri Lanka), and on and on.

DSC02477

Whenever I am there, it’s hard not to buy things, especially if I’ve never heard of them before, despite not being able to smell or taste them (the bags are sealed shut). I often bring them home and look them up online to try and find a use for them. More than once, they end up forgotten in the back of the spice pantry and eventually thrown out. This time I bought three things I already knew about and had wanted to buy for a while: star anise, ras el hanout (a Moroccan spice blend), and za’atar (a Middle-Eastern spice blend that varies from country to country – I bought the Lebanese kind).

DSC02513

I’ve already used the ras el hanout to make a rub for pork chops that I pan fried in some oil and finished in the oven. And the za’tar has gone over yogurt with olive oil (known as labneh) and fresh tomatoes with olive oil and salt. The star anise is waiting its turn.

The point I am trying to make is that I am a flavor explorer, as is Steve. Whenever we are in an ethnic market or grocery store, we’ll end up buying things that we’ve never tasted before, always searching for new gustatory experiences.

DSC02501

So it might come as a surprise when I tell you that until a few months ago I couldn’t really tell you what tarragon tasted like. I knew about it, I’d seen it many times in the store, but I never cooked with it or remembered eating anything with tarragon in it. And then the tarragon epiphany happened. I don’t remember which recipe started this but there was one recipe I tried that called for tarragon and as soon as I bought it and smelled and tasted the sweet anise-like aroma and flavor I knew I would use a lot more of it, something I have happily done since then.

Today’s recipe appeared in the New York Times and I liked its simplicity and flavor profile. I tried to modify it to maintain the crisp skin of the thighs but my attempts were unsuccessful. The only thing that could work is placing the pan under a hot broiler for a few minutes at the end, in order to recrisp the chicken skin.

DSC02520


Chicken with Shallots, Tomatoes, and Tarragon – Slightly adapted from the New York Times

Makes 2 servings

Ingredients:

4 bone-in, skin-on chicken thighs
1 tablespoon flour
½ tablespoon kosher salt
½ tablespoon ground black pepper
1 tablespoons unsalted butter
7-8 whole medium shallots, peeled, ends trimmed
1 cup white wine
1 tablespoon Dijon mustard
2 sprigs tarragon
1 cup cherry tomatoes, cut in half

Directions:

Rinse chicken thighs and pat them very dry with paper towels. Trip any excess fat or skin. Sprinkle over both sides of thighs the flour, salt and pepper.

Melt the butter in a large, heavy-bottomed pot or skillet set over medium-high heat. When the butter foams, cook the thighs, skin-side down first, in batches if necessary, until the skin is well browned and crisp, about 7-8 minutes. Turn thighs over and cook for another 1-2 minutes. Remove from pot and set aside.

Add the whole shallots to the pot and sauté them in the butter and chicken fat until they begin to soften and caramelize, approximately 6 to 8 minutes. Remove the shallots from the pot. Lower the heat to medium low. Add the wine to deglaze the pot, stirring with a heatproof spatula, then add the mustard and tarragon. Stir until mustard is almost fully combined. Add the chicken thighs skin side up and nestle the shallots between them.

Cover the pot, turn the heat to low and simmer for 25-30 minutes.

Remove the lid, raise the heat to medium and allow the sauce to reduce and thicken, 15 to 20 minutes.

Add the tomatoes and stir lightly to combine. Serve immediately. If you want to recrisp the chicken skin, place under a hot broiler for a couple of minutes.


Lemon Olive Oil Custard

DSC02526

A couple of years ago, we finally got rid of our rickety old blender, the one I had had since my early days in New York, when I threw big parties in my 400 sq ft studio apartment, telling friends and acquaintances to bring their own friends (“especially if they are cute, wink, wink”) and ending up with 100 people squeezed in that tiny space, my bed disassembled and the mattress leaning on the wall on its side to make room, and the white kitchen tile floor turning sticky and charcoal grey from spilled drinks stepped over many times by city worn shoes.

DSC02551

What was I talking about? Oh yeah, the blender. Many a frozen drink were prepared in that little blender. Did we care that the drinks were always too icy instead of smooth, with the all too frequent stubborn chunks of frozen fruit chocking our straws? No, we didn’t care. We were too drunk, too young, too happy to care.

But the time came to give up youthful blenders and chunky cocktails. So we splurged and bought a Vitamix blender. We never looked back (like with so many things from our younger days). This thing will blend anything in seconds. Give it a few minutes at full speed and it will actually heat up whatever you’re blending, enough to cook it. Which is convenient, when you’re trying to make a cooked custard in a blender. This recipe is genius (it comes in fact from Genius Recipes at Food52.com). Use good olive oil and substitute regular lemons for Meyer lemons if you can’t find them.

And when you’re done, eat it with a spoon (it’s spreadable, more like a curd) and reminisce about your partying days of yore.

DSC02533


Lemon Olive Oil Custard – Slightly adapted from Food52.com

Notes: This recipe was tested with a Vitamix Professional Series blender. Set the blender at its top speed and run for a total process time of 5 minutes 45 seconds. Any other blender will most likely not cook the custard and will leave it raw. If you don’t have a high speed blender, simply blend until smooth and frothy in step 2, stream in the olive oil with the motor running, then pour into a double boiler or bowl set over gently simmering water on the stovetop, stirring until it thickens up (it should reach 160 degrees for fully cooked eggs, or hold at 140 degrees for 3 1/2 minutes).

Ingredients:

3 whole eggs, room temperature
1/2 cup sugar
1/2 cup Meyer lemon juice (or regular lemon juice)
2 tablespoons Meyer lemon zest (or regular lemon zest)
1/2 teaspoon vanilla extract
1/2 cup very good quality extra virgin olive oil

Directions:

1. Place all ingredients but the olive oil in a high-speed blender (capable of generating frictional heat above 160 F). If you don’t have a high-speed blender, see note above.

2. Turn the blender on to its highest setting and process for 4 minutes.

3. While continuing to run on high speed, pour in the olive oil and blend for an additional 90 to 105 seconds until you can see the custard firming up on the sides.

4. The custard can be refrigerated for up to three days or frozen for longer storage. When defrosted, it will return to the same creamy consistency as when fresh.

Vodka Rosemary Lemonade Fizz

DSC02589

Steve and I took a short vacation last week, hence the lack of post over the weekend. We visited our friends in California and the four of us rented a house in Palm Springs for three days. We did nothing but eat and drink and be lazy. It was hot and mostly sunny there, perfect weather for an ice cold cocktail, so we made one of our favorites: vodka rosemary lemonade fizz. The first time we made this was a few years back for a party we had. We thought it would be a bust, that people would find it too simple or the herbal taste of rosemary too strong. But it was a huge hit and the recipe has been passed around from friend to friend ever since. It’s a simple recipe, really. Basically a rosemary infused lemonade, mixed with vodka, and topped with club soda. Pour yourself a glass and toast the arrival of spring.

Vodka Rosemary Lemonade Fizz – From Epicurious.com

Makes 8 8oz drinks

Ingredients:

1 cup fresh lemon juice
1 cup sugar
2 (8-inch) rosemary sprigs
unflavored vodka
Chilled club soda or seltzer
Garnish: 8 (3-inch) rosemary sprigs

Directions:

Bring lemon juice, sugar, and rosemary to a boil in a small saucepan, stirring until sugar has dissolved, then reduce heat and simmer 2 minutes. Cool completely, about 1 hour. Discard rosemary sprigs.

Fill 8 (8-ounces) glasses halfway with ice. Divide syrup (about 2 tablespoons each) among glasses and add vodka (1-2 tablespoons each, depending on how strong you want it). Top off with club soda.

Chocolate Coconut Pound Cake

DSC02395

“We had dinner last night with our friends and there was another couple with us. The woman, Mrs. P., said that she was your teacher and that she remembers you. Do you remember her?” my mother said to me on the phone the other day.

I definitely remembered Mrs. P. She was my very first chemistry teacher, back when I was in 7th grade. In fact, I remember the first day she showed us a chemistry experiment because it was the day I decided I would be a chemist.

DSC02388

She stood there, behind the large chemistry lab table, a young woman with a pixie cut, explaining to us the difference between an acid and a base and what happens when the two mix. We listened to her patiently but our attention was focused on something else: the test tubes and beakers in front of her. We had heard from older kids in the school about the “cool” experiments you got to do in 7th grade and we couldn’t wait to witness them.

She didn’t disappoint. When she added the pH indicators, we watched in awe as the clear liquids changed colors indicating their nature. But it was the grand finale, when she combined the hydrochloric acid and sodium hydroxide, changing the color once again to indicate their transformation into water and common table salt, that my heart started to race. In that instant, I knew that I loved chemistry and I would dedicate my life to studying it.

DSC02390


It wasn’t until many many years later, after playing with a Christmas gift of a chemistry set, after the introduction to organic chemistry that bored me to tears, and after years spent over a mixing bowl, that I realized that what I experienced in that chemistry lab on that day was not a realization of my love for chemistry. That it wasn’t the chemicals and their nature that excited me. That it was the process of combining things to create new ones that made my heart burst with possibilities. I didn’t know it then, but I had just discovered my love for cooking.

So, here’s my favorite kind of chemistry experiment: a recipe for a tender and rich chocolate pound cake. I’m sure there are laws of chemistry behind the whole process, but who really cares when the end result is so delicious?

Chocolate Coconut Pound Cake – Slightly adapted from Bon Appétit

Ingredients:

¼ cup unsalted butter, room temperature, plus more
1½ cups all-purpose flour
½ cup unsweetened cocoa powder
1 teaspoon kosher salt
¾ teaspoon baking powder
½ cup virgin, unrefined coconut oil, room temperature
1½ cups sugar (plus an optional 1 tablespoon sugar for topping)
3 large eggs
1 teaspoon vanilla extract
⅔ cup buttermilk
¼ cup unsweetened coconut flakes

Directions:

Preheat oven to 325° F. Butter an 8×4” loaf pan and line with parchment paper, leaving a generous overhang on long sides. Whisk flour, cocoa powder, salt, and baking powder in a medium bowl; set aside.

Using an electric mixer on medium-high speed, beat oil, ¼ cup butter, and 1½ cups sugar until pale and fluffy, 5–7 minutes. Add eggs one at a time, beating to blend between additions; beat until mixture is very light and doubled in volume, 5–8 minutes. Add vanilla.

Reduce mixer speed to low and add dry ingredients in 3 additions, alternating with buttermilk in 2 additions, beginning and ending with dry ingredients (do not overmix; it will cause cake to buckle and split). Scrape batter into prepared pan and run a spatula through the center, creating a canal. Sprinkle with coconut. If you want, sprinkle the optional remaining 1 Tbsp. sugar on top.

Bake cake, tenting with foil if coconut browns too much before cake is done (it should be very dark and toasted), until a tester inserted into the center comes out clean, 70–80 minutes. Transfer pan to a wire rack; let cake cool in pan 20 minutes before turning out.

Toasted Coconut Waffles

DSC02466

Steve and I went to Smorgasburg for lunch yesterday. It’s the outdoor food market that has been operating in Williamsburg, Brooklyn for the last few years. If you like food, it’s paradise. Stand after stand of prepared food from all corners of the world. Not your typical New York city street fair stuff, but quality food, like fried anchovies, fresh lobster rolls, beet sliders, ramen burgers, and little mini filipino spring rolls that burst with flavor.

DSC02433

When the weather is nice, it’s a beautiful scene. The Manhattan skyline in the background frames the smells and people mingling on the concrete plaza of the East River park, creating an urban tableau that attracts tourists from all over the world. But yesterday was the first day of its outdoor operation for this season (it moves to a smaller, indoor location in the winter) and let’s just say the weather wasn’t quite ready.

DSC02429


It was sunny but cold and really windy. Steve and I walked into the park and it was a like a scene for some yet-to-be-produced comedy series lampooning the new Brooklyn. Flannel shirts were fluttering everywhere. People were dodging garbage that kept being swept up by gusts of wind and thrown about. Hipsters were trying to eat their asian hot dogs without quite succeeding at preventing the toppings from flying straight into their unkempt beards. It was pretty funny.

Anyway, this recipe has absolutely nothing to do with Smorgasburg, Brooklyn, or anything else from this story. But these toasted coconut waffles have become our current favorites, especially since we’ve needed a break from the raised waffles we’ve been eating for years now. These are heartier waffles and the taste of toasted coconut is assertive but not overwhelming.

DSC02453


Toasted Coconut Waffles Sligthly adapted from Bon Appétit

Note: You really need to use virgin, unrefined coconut oil for this, the kind that has a coconut taste and some coconut flakes in it. The refined kind will make these somewhat bland.

Ingredients:

¾ cup unsweetened shredded coconut
1½ cups all-purpose flour
½ cup cornstarch
1 teaspoon kosher salt
1 teaspoon baking powder
½ teaspoon baking soda
2 large eggs
1 cup buttermilk
1 cup whole milk
⅔ cup virgin, unrefined coconut oil, melted
¼ cup sugar

Directions:

Preheat oven to 400° F. Toast coconut on a rimmed baking sheet until golden brown, about 5-8 minutes. Let cool.

Whisk flour, cornstarch, salt, baking powder, and baking soda in a large bowl. Whisk eggs, buttermilk, milk, oil, and sugar in a medium bowl. Whisk buttermilk mixture into dry ingredients (do not overmix). Mix in coconut.

Working in batches, cook waffles in your waffle iron until golden brown. Serve topped with butter, syrup, and fresh fruit.