Lemon Olive Oil Custard

DSC02526

A couple of years ago, we finally got rid of our rickety old blender, the one I had had since my early days in New York, when I threw big parties in my 400 sq ft studio apartment, telling friends and acquaintances to bring their own friends (“especially if they are cute, wink, wink”) and ending up with 100 people squeezed in that tiny space, my bed disassembled and the mattress leaning on the wall on its side to make room, and the white kitchen tile floor turning sticky and charcoal grey from spilled drinks stepped over many times by city worn shoes.

DSC02551

What was I talking about? Oh yeah, the blender. Many a frozen drink were prepared in that little blender. Did we care that the drinks were always too icy instead of smooth, with the all too frequent stubborn chunks of frozen fruit chocking our straws? No, we didn’t care. We were too drunk, too young, too happy to care.

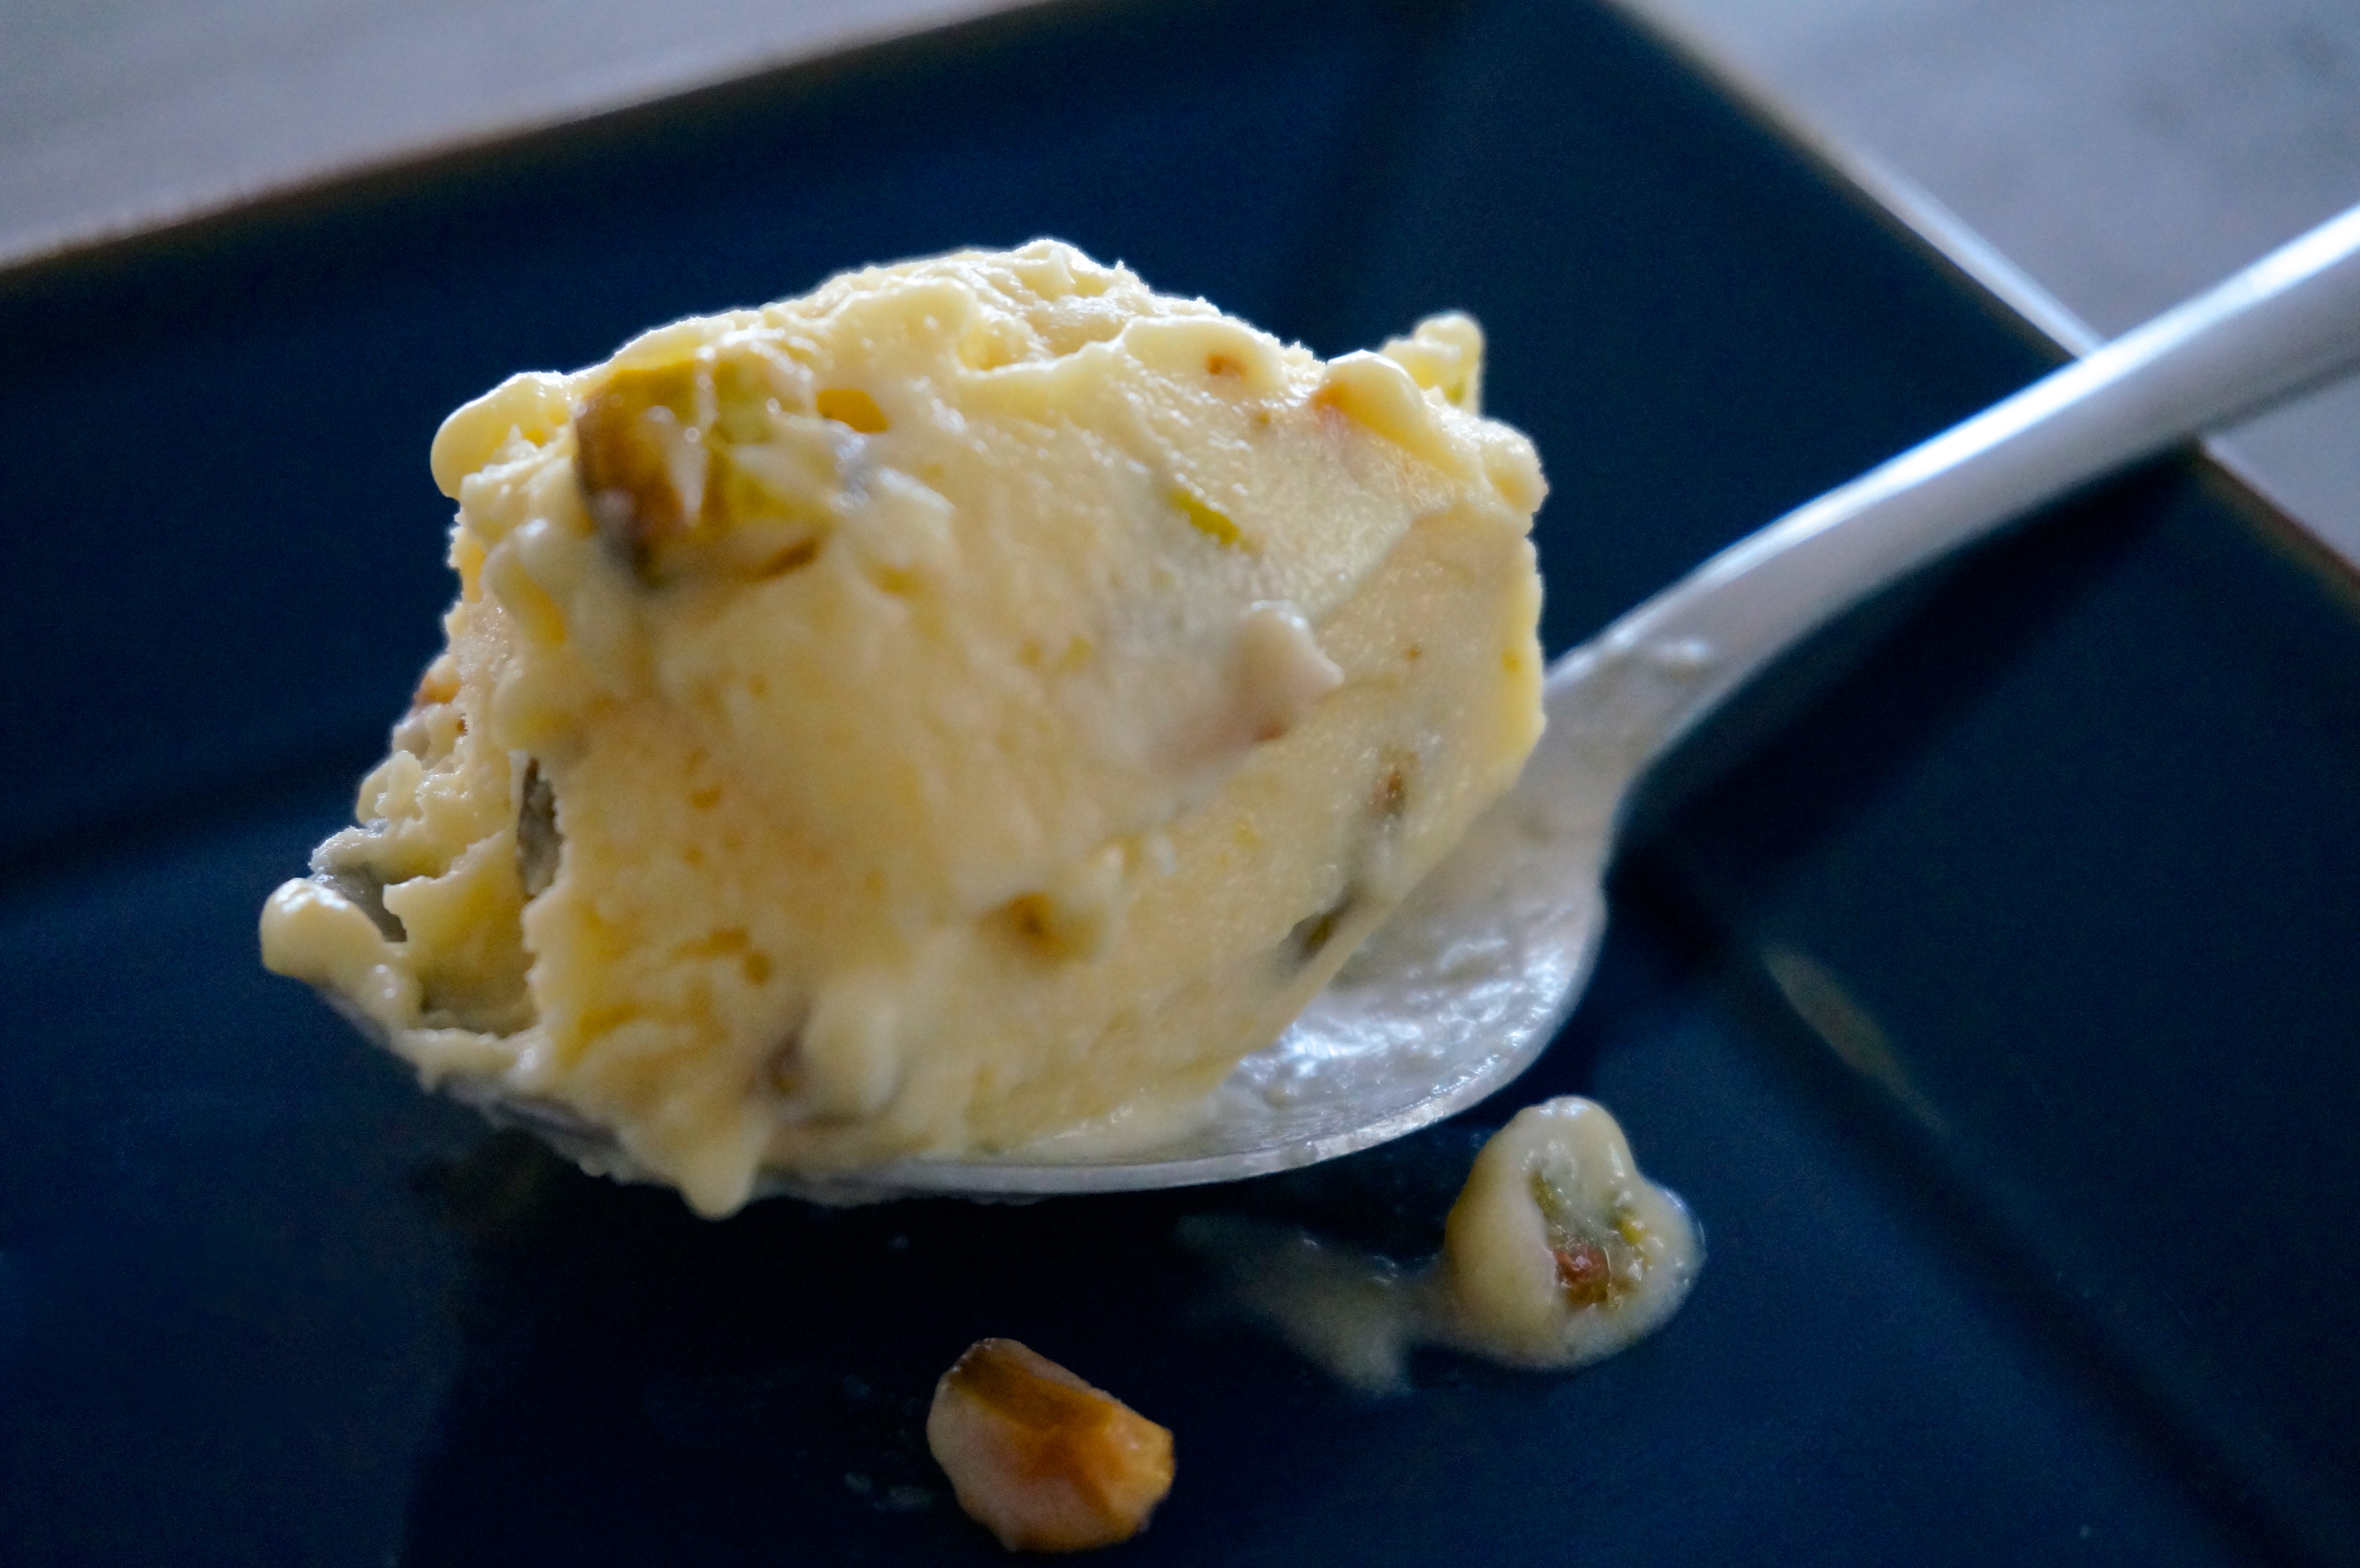
But the time came to give up youthful blenders and chunky cocktails. So we splurged and bought a Vitamix blender. We never looked back (like with so many things from our younger days). This thing will blend anything in seconds. Give it a few minutes at full speed and it will actually heat up whatever you’re blending, enough to cook it. Which is convenient, when you’re trying to make a cooked custard in a blender. This recipe is genius (it comes in fact from Genius Recipes at Food52.com). Use good olive oil and substitute regular lemons for Meyer lemons if you can’t find them.

And when you’re done, eat it with a spoon (it’s spreadable, more like a curd) and reminisce about your partying days of yore.

DSC02533


Lemon Olive Oil Custard – Slightly adapted from Food52.com

Notes: This recipe was tested with a Vitamix Professional Series blender. Set the blender at its top speed and run for a total process time of 5 minutes 45 seconds. Any other blender will most likely not cook the custard and will leave it raw. If you don’t have a high speed blender, simply blend until smooth and frothy in step 2, stream in the olive oil with the motor running, then pour into a double boiler or bowl set over gently simmering water on the stovetop, stirring until it thickens up (it should reach 160 degrees for fully cooked eggs, or hold at 140 degrees for 3 1/2 minutes).

Ingredients:

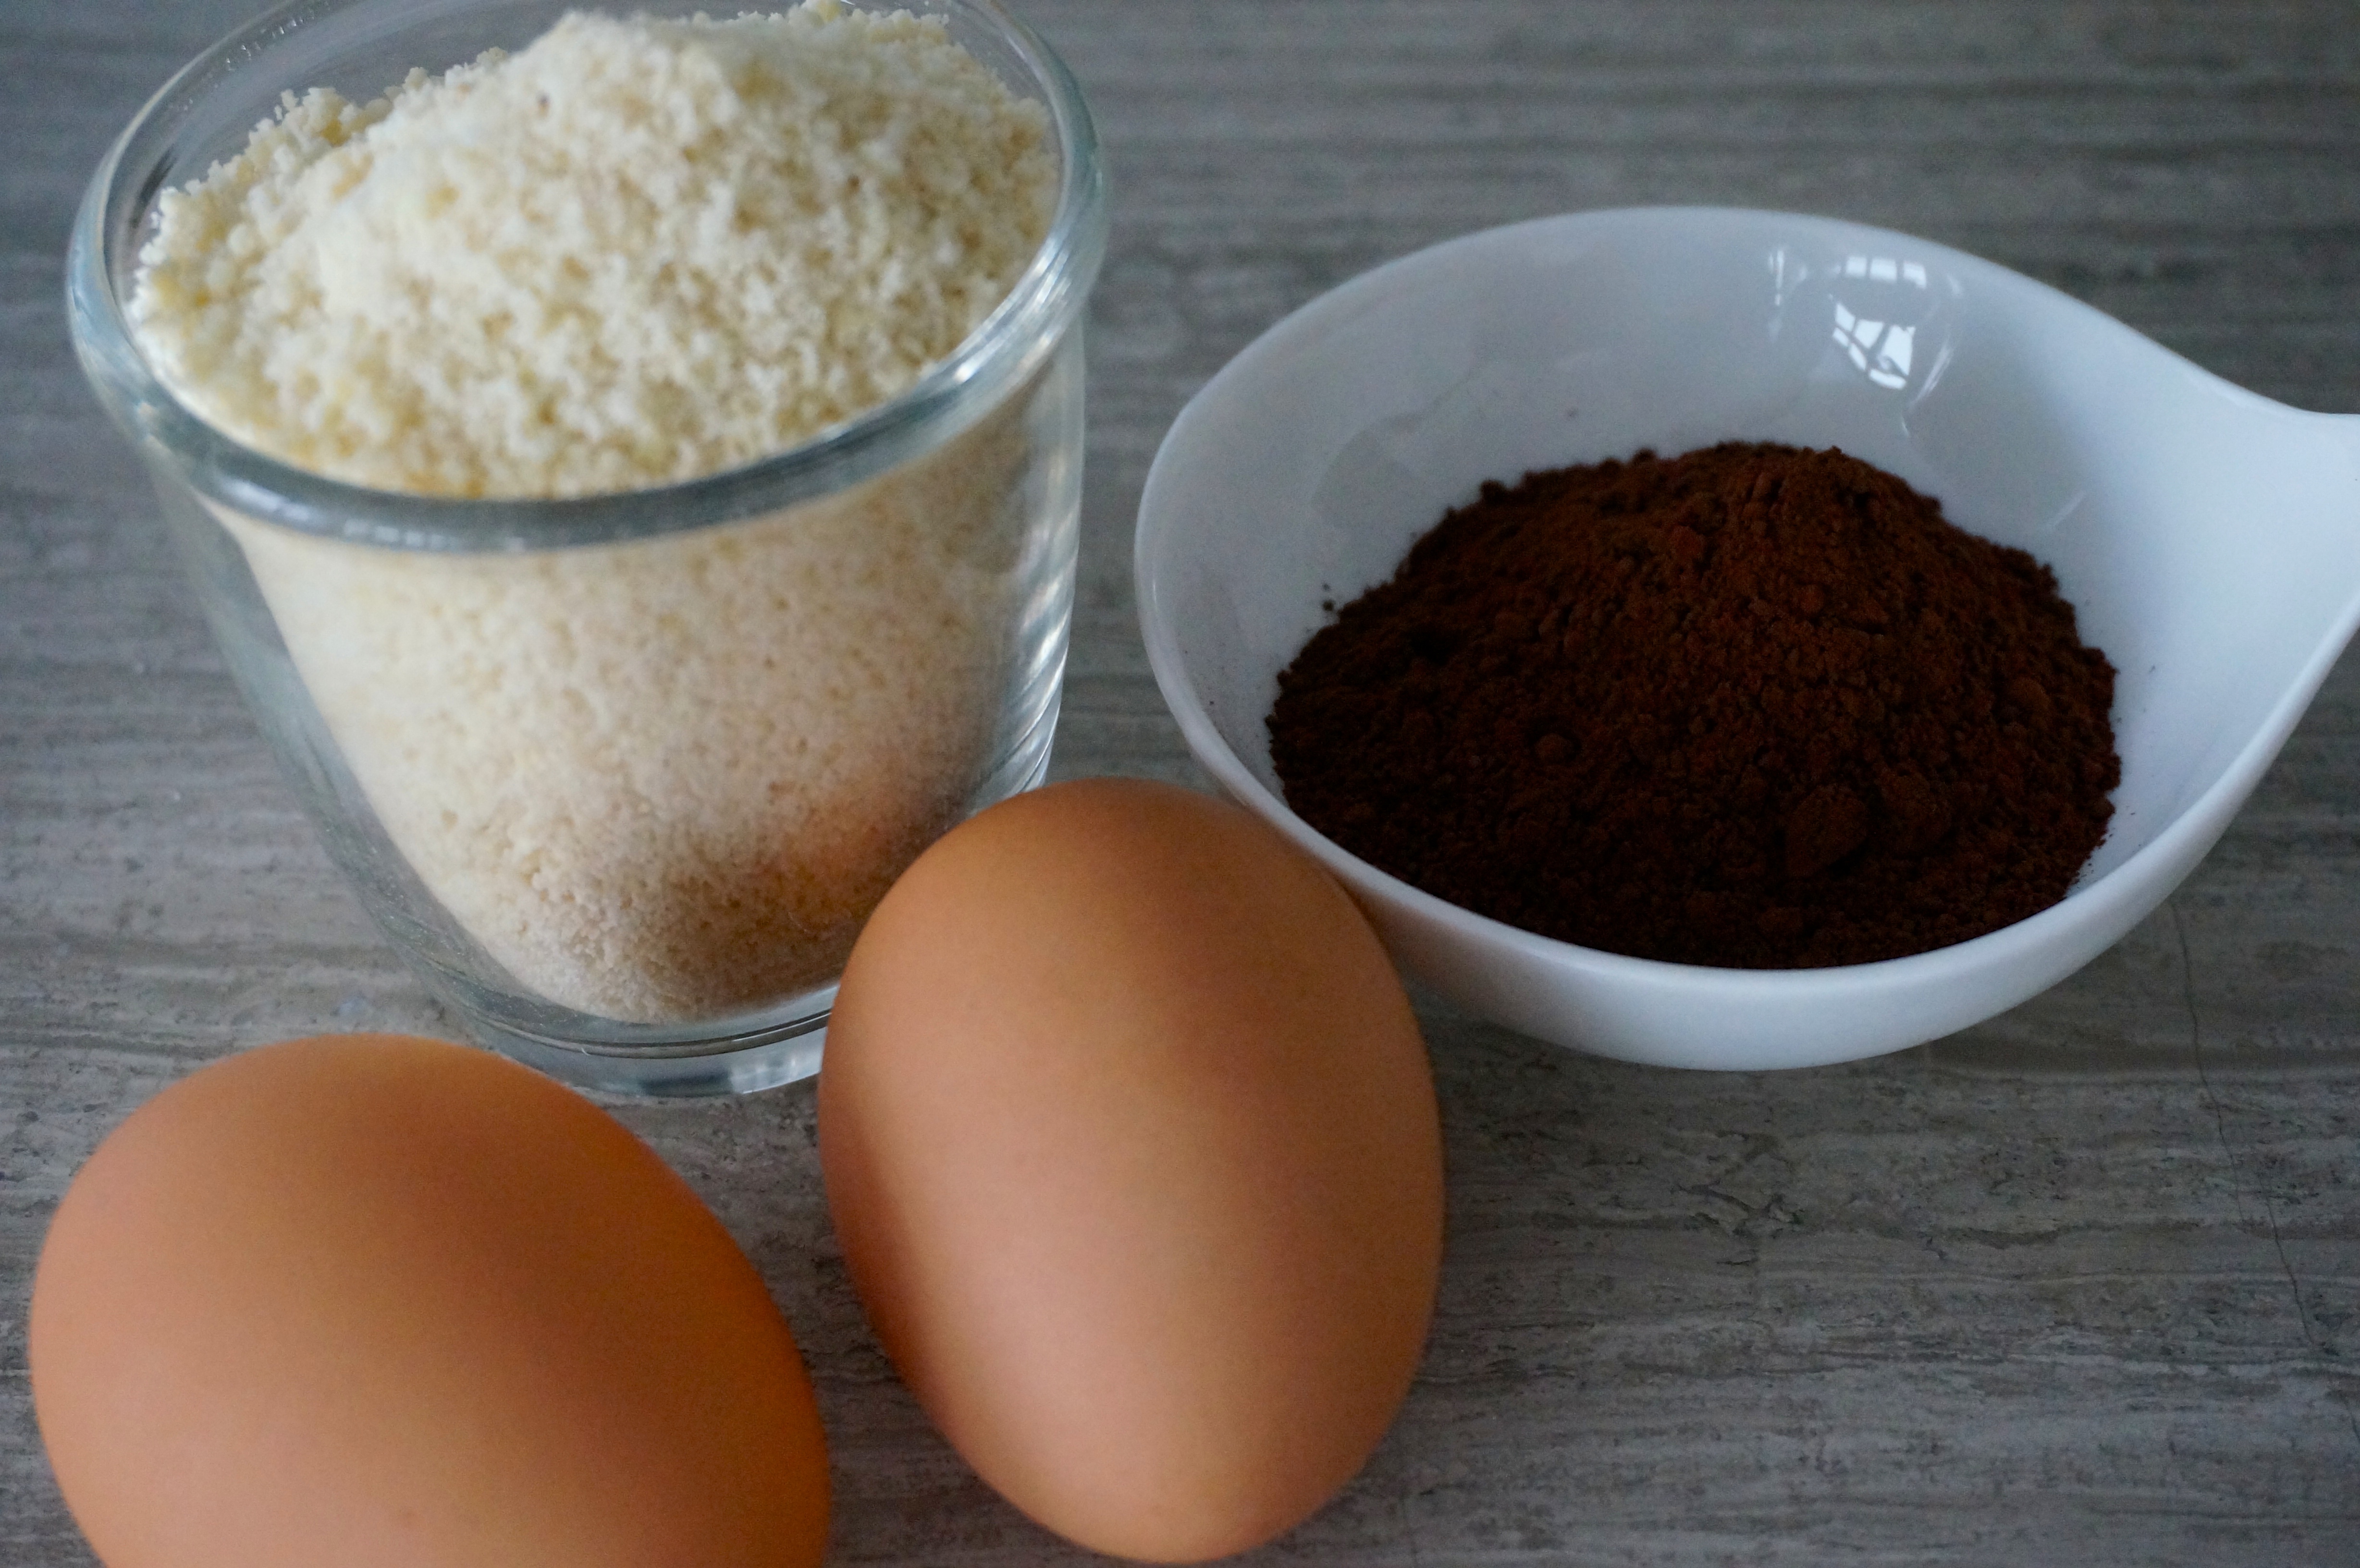
3 whole eggs, room temperature
1/2 cup sugar
1/2 cup Meyer lemon juice (or regular lemon juice)
2 tablespoons Meyer lemon zest (or regular lemon zest)
1/2 teaspoon vanilla extract
1/2 cup very good quality extra virgin olive oil

Directions:

1. Place all ingredients but the olive oil in a high-speed blender (capable of generating frictional heat above 160 F). If you don’t have a high-speed blender, see note above.

2. Turn the blender on to its highest setting and process for 4 minutes.

3. While continuing to run on high speed, pour in the olive oil and blend for an additional 90 to 105 seconds until you can see the custard firming up on the sides.

4. The custard can be refrigerated for up to three days or frozen for longer storage. When defrosted, it will return to the same creamy consistency as when fresh.

Chocolate Coconut Pound Cake

DSC02395

“We had dinner last night with our friends and there was another couple with us. The woman, Mrs. P., said that she was your teacher and that she remembers you. Do you remember her?” my mother said to me on the phone the other day.

I definitely remembered Mrs. P. She was my very first chemistry teacher, back when I was in 7th grade. In fact, I remember the first day she showed us a chemistry experiment because it was the day I decided I would be a chemist.

DSC02388

She stood there, behind the large chemistry lab table, a young woman with a pixie cut, explaining to us the difference between an acid and a base and what happens when the two mix. We listened to her patiently but our attention was focused on something else: the test tubes and beakers in front of her. We had heard from older kids in the school about the “cool” experiments you got to do in 7th grade and we couldn’t wait to witness them.

She didn’t disappoint. When she added the pH indicators, we watched in awe as the clear liquids changed colors indicating their nature. But it was the grand finale, when she combined the hydrochloric acid and sodium hydroxide, changing the color once again to indicate their transformation into water and common table salt, that my heart started to race. In that instant, I knew that I loved chemistry and I would dedicate my life to studying it.

DSC02390


It wasn’t until many many years later, after playing with a Christmas gift of a chemistry set, after the introduction to organic chemistry that bored me to tears, and after years spent over a mixing bowl, that I realized that what I experienced in that chemistry lab on that day was not a realization of my love for chemistry. That it wasn’t the chemicals and their nature that excited me. That it was the process of combining things to create new ones that made my heart burst with possibilities. I didn’t know it then, but I had just discovered my love for cooking.

So, here’s my favorite kind of chemistry experiment: a recipe for a tender and rich chocolate pound cake. I’m sure there are laws of chemistry behind the whole process, but who really cares when the end result is so delicious?

Chocolate Coconut Pound Cake – Slightly adapted from Bon Appétit

Ingredients:

¼ cup unsalted butter, room temperature, plus more
1½ cups all-purpose flour
½ cup unsweetened cocoa powder
1 teaspoon kosher salt
¾ teaspoon baking powder
½ cup virgin, unrefined coconut oil, room temperature
1½ cups sugar (plus an optional 1 tablespoon sugar for topping)
3 large eggs
1 teaspoon vanilla extract
⅔ cup buttermilk
¼ cup unsweetened coconut flakes

Directions:

Preheat oven to 325° F. Butter an 8×4” loaf pan and line with parchment paper, leaving a generous overhang on long sides. Whisk flour, cocoa powder, salt, and baking powder in a medium bowl; set aside.

Using an electric mixer on medium-high speed, beat oil, ¼ cup butter, and 1½ cups sugar until pale and fluffy, 5–7 minutes. Add eggs one at a time, beating to blend between additions; beat until mixture is very light and doubled in volume, 5–8 minutes. Add vanilla.

Reduce mixer speed to low and add dry ingredients in 3 additions, alternating with buttermilk in 2 additions, beginning and ending with dry ingredients (do not overmix; it will cause cake to buckle and split). Scrape batter into prepared pan and run a spatula through the center, creating a canal. Sprinkle with coconut. If you want, sprinkle the optional remaining 1 Tbsp. sugar on top.

Bake cake, tenting with foil if coconut browns too much before cake is done (it should be very dark and toasted), until a tester inserted into the center comes out clean, 70–80 minutes. Transfer pan to a wire rack; let cake cool in pan 20 minutes before turning out.

Gluten-free, Dairy-free Chocolate Orange Cake

DSC02255

This is what my cookbooks look like. Whenever I buy a new one I go through it and mark any recipe that looks like something I’d want to try. I like to use these nifty Post-it bookmarks that are clear where they attach to the page so that they don’t cover anything. As you can see from the photo (and this is only a small sample of the cookbooks I have), I end up with a lot of recipes that I want to try out. And this doesn’t include recipes from magazines and blogs, which I collect using the fantastic Paprika recipe manager app.

DSC02277

To make a long story short, I really shouldn’t be adding to my collection of recipes to try. But the other day I was reading a newspaper from back home online, when at the bottom of the page I noticed the title of a recipe: Incredibly Light Chocolate Orange Cake (without Flour).  I was intrigued. Chocolate and orange are one of my favorite flavor combinations (here’s looking at you, irresistible orangettes!). A quick look at the ingredient list revealed ground almonds as the substitute for flour and boiled, whole oranges as the substitute for butter. I was beyond intrigued. I had to try it.

DSC02240

The result was actually very interesting. A moist cake with a distinct chocolate taste but redolent with aromas of orange. I say aromas because the presence of orange in this cake goes beyond what you would get if you used only orange juice. Since it incorporates the entire fruit, you get the sweet and tangy flavor of the orange segments, the mellow bitterness of the pith, and the sharp taste of the orange oil from the rind. All together, it creates a not-too-sweet cake that begs for another bite, if only to decipher the complex combination of tastes hitting your tongue at the same time.

DSC02262

I know this post seems to come a day late, given that yesterday was Valentine’s day. But Steve and I don’t really do much on Valentine’s day, a day we feel ambivalent about. Back in my single days, I used to hold a dinner party for all my single friends, making beef bourguignon and a chocolate torte, all of us toasting to our singledom, in defiance of this silly holiday that taunted us.

Now that I think about it, given the bitter and sweet flavor combinations of this cake, it would perhaps make a perfect Valentine’s day cake, for both those in celebration of the day and those who don’t like it.

DSC02288

Gluten-free, Dairy-free Chocolate Orange Cake – Translated and slightly adapted from Phileleftheros

Ingredients:

2 small oranges, preferably organic/unsprayed (about 12 oz / 345 g)
2 tablespoons orange liqueur, like Grand Marnier
1 ½ teaspoon baking powder
½ teaspoon baking soda
½ cup unsweetened cocoa (2 oz / 55 g)
1 ¼ cups sugar (7 ¾ oz / 250 g)
2 cups ground almonds (7 oz / 200 g)
pinch of salt
6 large eggs

Directions:

Preheat the oven at 350º F (180º C). Lightly grease the bottom and sides of a springform 8″ (20 cm) cake pan. Cover the bottom of the pan with parchment paper.

Wash the oranges and place them in a medium-sized pot. Cover them with cold water and heat over medium-high heat until they come to a boil. Reduce the heat to low, cover, and let simmer for about 1 1/2 to 2 hours. Drain oranges and let cool. (Oranges can be boiled up to two days in advance and kept in the fridge)

Roughly chop the oranges, remove any pits, and place in the bowl of a food processor. Add liqueur and process until no pieces of orange are left. The mixture should be a relatively smooth pulp with small pieces of rind (it doesn’t have to become completely smooth). Add the baking powder, baking soda, cocoa, sugar, almonds, and a pinch of salt. Process until combined.

Add eggs one at a time, processing until each egg is combined. Pour mixture in prepared pan and bake for about 60 minutes, until a cake tester inserted in the middle comes out clean. Immediately run a sharp knife around the edge of the pan and place the pan on a cooling rack. Let cake cool completely in the pan.

Dried Apricot and Pistachio Ice Cream

DSC01362

So, apparently, the Super Bowl is happening in New York tomorrow. Yeah, that’s how much Steve and I follow football. To our defense, the Super Bowl is technically in New Jersey, not in New York city. But honestly, it could be two blocks away and we still wouldn’t know who’s playing in it. I saw the team names by accident today, while reading an article in the Styles section of the New York Times, so I blurted them out at lunch with a friend, making it seem like I always knew it was the Denver Broncos and the Seattle Seahawks (see how I did that?). They both looked at me with a look that said Who are you? so I told them the truth.

DSC01369

More pressing around here has been the weather. Days and days of below freezing temperatures have made even me, an avid winter lover, complain about the cold. You know it’s getting too cold when the East River fills with big, flat chunks of ice, floating down from upstate New York like mini icebergs, creating delays for the ferry. When you’re on a rickety old ferry boat, floating over a river that is so cold it freezes, the sound of thumps and scraping noises that it makes as it passes over sheets of ice can be very disconcerting.

DSC01391

So, it might seem strange that I am posting an ice cream recipe today but it’s really a way to cheat and give yourself a taste of summer. No fresh fruit around? No problem. Ice cream genius David Lebovitz has the solution. Take some dried apricots and reconstitute them with the help of some sweet wine and blend them into an ice cream. Given what’s around this time of hear, it’s really the best you can do.

Oh, and enjoy the Super Bowl. Go <insert you favorite team name here>!!

Dried Apricot and Pistachio Ice Cream – Slightly adapted from Perfect Scoop: Ice Creams, Sorbets, Granitas, and Sweet Accompaniments

Makes about 3 cups (750 ml)

Ingredients:

5 oz (140 g) dried apricots, quartered
3/4 cup (180 ml) sweet white wine (or dry white wine with 1 tablespoon of sugar blended in)
1/2 cup (70 g) shelled pistachio nuts (preferably unsalted)
2/3 cup (130 g) sugar
1 cup (250 ml) whole milk
1 cup (250 ml) heavy cream
a few drops of freshly squeezed lemon juice

Directions:

In a small saucepan, warm the apricot pieces with the wine. Simmer for 5 minutes, cover, remove from heat, and let stand for 1 hour. Meanwhile, coarsely chop the pistachios.

Purée the apricots with the wine in a blender along with the sugar, milk, cream, and lemon juice until smooth.

Chill the mixture in the refrigerator and then freeze in your ice cream maker according to the manufacturer’s instructions. During the last minute of churning, add the chopped pistachio nuts, or layer them as you scoop the ice cream into the container where you will keep it.

Persimmon Muffins

DSC01416

I don’t like Halloween. There, I said it. I kinda hate it actually. The fact that everyone looks different and acts weird just freaks me out. I don’t like sudden changes in my environment and Halloween turns everything upside down. Not to mention that being dressed up in a costume becomes an excuse for so many people to get drunk and belligerent, as if a wig and a mask makes it alright to be an asshole all of a sudden.

DSC01400

Before you start calling me the Grinch that stole Halloween, let me clarify that I don’t like Halloween for adults but I love it for little kids. Kids are adorable when they are in their costumes (adults are just creepy). Back in the 90s I lived in a sparsely populated town in New Jersey and every year I would go buy candy and get all excited for all the kids who’d come knocking at my door, not realizing that no kids lived in our neighborhood. So every year, not a single kid came by and I ended up eating that candy for weeks afterwards.

DSC01404

Growing up, we didn’t have Halloween but there was Carnival, which is pretty much the same thing. I hated it. My parents always did the best they could to dress us up and take us to these carnival kids parties, where we had to socialize with kids I didn’t know who were also wearing strange costumes. It made me dread these parties. I really didn’t want to go but my parents insisted that we should go and that we should play with the other kids there. I think they just wanted time to talk to the other parents, while I navigated the weird social jungle of kids dressed in strange outfits.

DSC01409

The only fun memory I have of Carnival as a kid was the first one I can remember. I must have been 4 or 5 years old and my mom dressed me up as a prince. It was a homemade costume (did she make it? I don’t remember), with a paper crown, satin shorts, and a puffy shirt. But the best part of it was the cape. An orange cape that tied around my neck. Man did I love that cape. I have a distinct memory of being at one of those godforsaken kids parties and walking away from everyone to an open space where I proceeded to run around in circles just so that I could feel my cape billow out behind me. It felt like flying and I loved it. That cape was the best Carnival/Halloween experience of my life. Nothing ever matched it.

DSC01405

So, in the spirit of Halloween today, I give you a dessert in disguise. It is now persimmon season, a fruit I never really knew or paid much attention to, until I got The Breakfast Book by the legendary Marion Cunningham and tried her recipe for persimmon muffins. When they came out of the oven, looking like dark hockey pucks, I though I’d have to throw them out. But then I took a bite and realized, that even though on the outside they wore the costume of an ugly, stale, and dense fruitcake, inside, they were the most delicious, moist pieces of tasty goodness I had made in a long time. I guess a stick and a half of butter will do that to you.

So happy Halloween to you all. Just stay out of my way tonight as I rush back home from work and shut the door to the crazy, weird things happening outside, waiting until everything returns to normal tomorrow morning.

DSC01418

Persimmon Muffins – Adapted from The Breakfast Book

Makes 16 muffins

Notes:

  • This recipe works best with Hachiya persimmons (the heart-shaped ones). Just make sure you use really ripe ones. They should be really soft to the touch, feeling like they are  past their peak ripeness. If they are hard, you can’t use them because they are still really astringent. If you use Kaki or Fuyu persimmons (the apple-shaped ones), you will also need for them to be ripe enough that you can mash them.
  • I’ve tried this recipe with coconut oil instead of butter. The muffins came out almost exactly the same. The only thing missing was the delicious taste of butter. But if you are concerned about the fat content, you can use coconut oil or a mix of the two.

Ingredients:

1 cup persimmon puree (from 3 very ripe hachiya persimmons)
1 teaspoon baking soda
12 tablespoons (1 1/2 sticks) butter, room temperature
1 1/4 cups sugar
2 eggs
1 1/3 cups all-purpose flour
1/2 teaspoon salt
1 teaspoon each: cinnamon, vanilla
2 teaspoons lemon juice
2 tablespoons brandy, (substitute with 2 tablespoons of apple juice if you prefer not to use alcohol)
1 cup pecans, broken into pieces
3/4 cup dried cherries

Directions:

1. Heat oven to 325 degrees. Grease muffin tins. Put persimmon puree into a small bowl and stir in baking soda. Set aside. The persimmon puree will harden.

2. Put butter in a mixing bowl and beat, slowly adding sugar, until mixture is creamy and smooth. Add eggs and beat well. Add flour, salt and cinnamon and mix. Break up the hardened persimmon puree with a fork and add it to the bowl, beating until well blended. Add vanilla, lemon juice and brandy. Stir in pecans and cherries.

3. Fill each muffin cup three-quarters full. Bake 45 minutes, or until a wood pick comes out clean when inserted into the center of a muffin. Remove from the muffin pans and let cool on racks.

Teddie’s Apple Cake

DSC01333

We just came back from a lovely weekend in the Hudson Valley, where we were visiting friends who have moved permanently there and opened a shop in Hudson, NY (It’s called Finch, and it’s amazing). The weather was beautiful, but there was the unmistakable chill of fall in the air.

And if you didn’t know it from the dying leaves, still showing some of their riotous colors of copper and sienna and gold yellows, or from the bright orange pumpkins crowding the farmer stands along the way, you certainly knew that fall was here from the abundance of apples everywhere.

DSC01331

It’s a funny season, the fall. Despite the many celebrations it holds (Halloween, Thanksgiving, Rosh Hashanah), it’s really a season of decay. The glorious life of the spring and summer, the flowers and trees and fruits just wither away during the fall, until the winter comes and everything goes into hibernation, in anticipation of the next spring.

DSC01327

But there are many reasons to love the fall. One of the biggest ones for me are apples. I love apples. So much can be done with them. Every fall, I start to crave apple desserts. Pies and cakes and crumbles and compotes. So, this fall I started with this recipe, which I found on the great Food52 Genius Recipes blog. Simple to make, this isn’t the prettiest of cakes. But it makes a hearty breakfast or a great accompaniment to tea or coffee on a cold fall afternoon. Or serve it with some caramel sauce drizzled over and some whipped cream and you have a dessert to die for.

DSC01343

Teddie’s Apple Cake Adapted from Food52

Note: The original recipe calls for raisins but I decided to use dried cherries because I like their tartness better. I also used pecans instead of walnuts because…well, I just don’t like walnuts.

The top of this cake is really crackly, so you want to make it in a pan where you don’t have to invert it to take it out. You can use a tube pan with a removable bottom, or you can line two loaf pans with parchment paper that is long enough to hang over the sides of the pan. That way, when the cake is finished, you just grab the two ends of the parchment paper and pull the cake out of the pan.

Ingredients:

Butter for greasing pan(s)
3 cups flour, plus more for dusting pan
1 1/2 cup vegetable oil
2 cups sugar
3 eggs
1 teaspoon salt
1 teaspoon cinnamon
1 teaspoon baking soda
1 teaspoon vanilla
3 cups peeled, cored, and thickly sliced tart apples like Honeycrisp or Granny Smith (from 2 large apples)
1 cup chopped pecans
1 cup dried cherries, roughly chopped

Directions:

1. Preheat oven to 350°F. Butter and flour a 9-inch tube pan. Or butter two loaf pans and line them with enough parchment paper that it overhangs on both long sides of each pan. In a medium bowl, whisk together 3 cups of flour, the salt, cinnamon and baking soda. Set aside.

2. Beat the oil and sugar together in a mixer until well combined, about 5 minutes. Add the eggs, one at a time, waiting until each is fully incorporated before adding the next. Beat until the mixture is thick and creamy. Add the vanilla, beat a few more seconds and then stop the mixer.

3. Add the flour mixture in the batter and fold in until just combined. Add the apples, pecans and dried cherries and stir just until combined.

4. Transfer the mixture to the prepared pan(s). Bake for 1 hour and 15 minutes, or until a toothpick inserted in the center comes out clean. Cool in the pan before lifting out.

Vanilla Almond Orange Cloud Cookies

Last weekend, I was sitting next to our friends’ adorable six-year old daughter, eating breakfast, when she turned to me and asked:

– Why don’t you and Steve have kids?

The question stopped me in my tracks. I mean, how do you tell a six-year old that growing up you always thought you’d have kids, you always assumed you would, but then you hit your 20s and boom! this life changing event happened – you came out? How do you explain to her that at that point you thought, ok, this settles it, I’m not going to be able to have kids, and you kind of came to terms with that but then the years passed and you saw more and more same-sex couples actually doing it, actually having kids of their own, and you thought maybe that will be me?

How do you tell her that for many years you were still finding your way, still looking for a partner in life, so kids were not in your plans, and then you met a man, a wonderful man, who would turn out to be the love of your life, your future husband? How do you describe how much fun you were having together and how the years started adding up one at a time until you both realized there was a deadline coming, to make a decision on having kids, and that the deadline came and you talked and you realized that you just loved your life together too much and you were too old by then, too satisfied with the way things were, too content with everything to disrupt it with the addition of a kid?

IMG_2263

How do you explain to this inquisitive, smart, and beautiful six-year old girl that it was a tough decision, a really tough decision, and that there are days when you are going to work and you see a blond-headed toddler who looks so much like Steve did in all the photographs from when he was little, and the little boy waves at you and your heart skips a beat? How do you describe the wistful feeling you have when you imagine a little version of Steve running around, but then the toddler starts to cry and scream and you see the parent scramble and try to find a way to make him happy, and you think yes, that’s right, it’s a sacrifice and a commitment for life and you weren’t ready to make either, and that is ok?

IMG_2258

Well, you don’t tell her any of these things. And I didn’t. I just smiled and told her simply that Steve and I had decided that we wouldn’t have our own kids and that we were instead really happy that we had so many friends in our lives with kids, just like her own dads and her and her brother.

As we both went back to our breakfasts, I thought of that alternate universe where our lives had taken a different path, one which included a little boy of our own, and how as soon as he was able to do so, I would bring him in the kitchen and show him how to help me make these vanilla almond orange cloud cookies, and how  much fun we’d both have making them and eating them. But then, someone asked me a question about one thing or another and the conversation shifted and the day took its own course.

IMG_2256

Vanilla Almond Orange Cloud Cookies – Adapted from Joy the Baker

1 cup granulated sugar
1 teaspoon orange zest
1 vanilla bean, seeds scraped
10 ounces almond paste
1/4 teaspoon salt
2 large egg whites, lightly beaten
powdered sugar

Place two racks in the center and upper third of the oven and preheat oven to 325º  F. Line two baking sheets with parchment paper and set aside.

In a small bowl, mix together granulated sugar, orange zest, and scraped vanilla seeds. Use your fingers to works the zest and vanilla into the sugar, creating a fragrant, moist sugar.

Place sugar in the bowl of an electric stand mixer fitted with a paddle attachment. Add the almond paste. Beat on medium speed creating a crumbly sugar and almond mixture.

While almond mixture is combining in the mixer, place two egg whites in a small bowl. Whisk with a fork until loose and frothy. This will help in pouring the egg whites into the mixer. With the mixer on medium speed, gradually pour the egg whites in to the crumbly almond and sugar mixture. Beat until a smooth paste is formed.

Spoon or scoop batter by the heaping tablespoonful onto the prepared baking sheet. Sprinkle generously with powdered sugar. Using the tips of three of your fingers, make indentations in each cookie.

Bake cookies for 20 to 25 minutes or until cookies are lightly browned on top. Remove from the oven and allow to cool on the pan. Store cookies in an airtight container at room temperature for up to 5 days.